Thursday 30 January 2020

The Developer's Conference - not only about software freedom

LPI Study Materials, LPI Guides, LPI Tutorial and Materials, LPI Prep

Do you know the average lifespan of a transgender human being in Brazil is 35 years? Also, 73% of them suffer verbal aggression every day and 25% have suffered physical aggression (1). Shocking, right? Is this the kind of thing you would expect to learn from a Developer's Conference? Probably not. This is just one of the reasons issues like these are raised at The Developer's Conference.

The Developer's Conference, or TDC, started in 2007 in the city of Sao Paulo, Brazil, with about 300 participants. It grew steadily and impressively over the years, and its latest edition hosted more than 6,000 people in the city of Porto Alegre. Although several Linux Professional Institute (LPI) collaborators participated in the event in the past, it was in 2018 that the LPI established a formal relationship with TDC, sponsoring the DevOps Tools Track and giving a talk on Careers in Technology.

The DevOps Tools track started with a talk on DevOps Tools 101, by Gabriela Dias, a long time LPI collaborator. She gave a brief overview on the tools every person working in the DevOps field should consider, and also talked about the importance of getting to know the Linux Professional Institute DevOps Tools Engineer certification objectives: “Of course a certification by itself is not a universal declaration of someone’s knowledge. It is, however, what will make your resume stand out in front of a recruiter or someone hiring you as a freelancer. It clearly shows you invest in your career,” said Gabriela in her talk.

All of the other talks covered most of the modern DevOps tools, with several industry practical cases, from startups to a nationwide Bank. As TDC is a conference from developers to developers, everyone freely, and in an extremely open fashion, talked about their successes and failures before achieving their goals.

LPI Study Materials, LPI Guides, LPI Tutorial and Materials, LPI Prep
As a speaker, I also was entitled to participate in other TDC tracks, and as LPI is soon to release its IoT Essentials exam, I was especially interested in this theme. The great expectation in the Internet of Things is the newest 5G mobile communications technologies and the amount of new devices already being tested by the industry. We are not talking about something as mundane as having your coffee ready before you get home. Now, it is about integrating sensors spread among diverse fruit farms, and having them communicate among themselves with a satellite network gathering real-time data so the transportation logistics will be planned by artificial intelligence analysing huge amounts of information. This is not a far-fetched future. Instead, it is a future companies are already hiring people to work with. A main concern raised in this track though is how to avoid vendor lock-in and keep all related technology really open: both specifications and standards.

Aside from the technology, TDC fully embraces the first and most important value of the Manifesto for Agile Software Development: Individuals and interactions over processes and tools. Healthy food and coffee are available throughout the event and the speakers are entitled to mentoring on how to improve their talks and get better feedback from the public. All participants of the congress can also enroll for individual career advice. Diversity and inclusion are also big topics around the event and specially in the Diversity track, in which I had the honor to participate. This brings me back to the first paragraph of this post.

All minority groups have a voice inside TDC, and starting this year with a special track on transgender challenges had a great impact on the overall event. There were talks ranging from how to think about diversity and inclusion on user interfaces and experience, to how to use Kanban techniques to fight depression. The companies participating in this track also showed it makes economic sense to diversify their teams, although they recognize that they still need to do a better job.

Noah Scheffel was the one who presented the sad statistics I used to open this post. He envisioned, no more than a year ago, an initiative that became EDUCATRANSFORMA, a bridge between transgender people and the ICT work market. The initiative became a university extension project hosted by the Federal University of Rio Grande do Sul,and is supported by a growing number of companies.

It was interesting to hear and talk to many people participating at the TDC, and to recognize the feeling that only true education, based on knowledge that is free to everybody, will help to solve real societal problems, defeat prejudice, and include all human beings.

Source: lpi.org

Monday 27 January 2020

The Linux LPIC Level-1 Certification at a Glance

What is the LPI Certification?

The Linux Professional Institute has primarily created Linux certifications for getting entry into senior-level positions. The Linux Professional Institute, which is also referred to as LPI, is a nonprofit organization that is based in Canada. The organization encourages the usage of free software, Linux, and Open Source. The organization offers Vendor-Neutral Linux Certifications to information technology professionals throughout the world. It presently has 400 training partners, which signifies that it is the largest Linux Certification (Vendor Neutral) body in the world.

LPI certifications are also rated as the best among all the different Linux Certifications that are available online.

Overview of LPI Certification

LPI certification is very simple and is a group of there different certifications. All of the certifications are dependent on one another, as you will realize once you read this article.

The first certification on the LPI certification track is LPIC-1, which is fundamentally an entry-level certification that is designed for individuals who can configure and install a workstation operating Linux. Such individuals can also configure the fundamental network and monitor the maintenance of the system directly from the command line. LPIC-1 is also known as Linux Administrator.

The LPIC-2 is termed as Linux Engineer. It is a mid-level certification that has been basically created for professionals who can manage both medium and small-sized mixed networks.

LPIC-3 is known as Linux Enterprise Professional. It is a senior-level certification that is recommended for Linux Professionals who can plan, troubleshoot, conceptualize, and design Linux installations in environments that are an enterprise in context.

To obtain LPIC certification, you need to pass two multiple choice exams. The cost of each exam is $200. Pearson VUE administers the exam. Linux essentials certification is beneficial for all those individuals who are just beginning their Linux careers. Linux essentials include all the core skills such as Linux operating system and command-line editing.

Linux LPIC level-1 certification at a Glance

As mentioned already, the LPIC certification is an excellent choice for individuals who are interested in the IT field.

LPIC differentiates engineers from various levels. The original 3 level system is extremely compatible with real-world scenarios and experience. Many Linux enthusiasts and engineers take advantage of Linux LPIC level-1 certification to take their knowledge to the next level.

The first exam is “LPIC-1 101-500”. The exam includes file systems, system architecture, bolts, and nuts of Linux installation and Unix commands.


The second exam is “LPIC-1 102-500”. This exam measures individuals’ expertise in the shell environment, running scripts, managing databases, and running of SQL commands.


To pass the LPIC exam, you also need to have a stronghold on configuring settings for the desktop and user interfaces. You also must be fluent in securing Linux systems and creating network connections.

Skills Required for Linux LPIC-1 Certification Exam

To pass Linux LPIC level-1 certification, you need to have some level of expertise in different areas of Linux. To appear for this exam, no prior knowledge related to Linux is necessary.

  • You must learn how to work on the command line such as shells, the role of command shells, the shell prompts, navigation of the file system, changing of the shell, and important environment variables.
  • You must learn about using pipes, redirects, and You must have firm knowledge about the standard quoting rules, nesting of commands, and brace expansion.
  • To pass Linux LPIC level-1 certification, you must have firm knowledge about managing ownership and file permissions. You must know about the directory permissions, changing of file permissions, and certainly, file ownership.
  • To pass the Linux LPIC level-1 certification test, you need to have some knowledge about deleting, creating, and displaying of files. You are expected to know about directory manipulation, file manipulation, and file system links.
  • You should know how to work with compression and archives.
  • You must know how to use the filters for the processing of text streams.
  • It would help if you had a firm grip on how to use the regular expressions for the searching of the text files.
  • To clear the Linux LPIC level-1 certification exam, you must know how to do the primary file editing operations using VI.
  • You should know how to kill, create, and oversee the processes. You must know how to utilize the advanced screen and signals.
  • It would be best if you are highly skilled in DEBIAN AND YUM package management.
  • A certain level of knowledge relevant to working with partitions, disk quotas, and file systems.
  • You need to have a certain level of understanding of the Linux Boot Process.
  • You must know how to configure and identify the hardware settings.
  • In the end, you must learn about the fundamentals of Linux if you want to pass the Linux LPIC level-1 certification.

Conclusion

Linux LPIC level-1 certification is a beneficialcertification that will help you advance in your career. However, just like any other certification, getting it is not a cakewalk. You need to work hard and prepare well for your exam if you want to obtain the certification. There are many online study materials, practice tests, you tube videos available on the internet through which you can easily prepare for the actual LPIC certification exam.

Sunday 26 January 2020

LPIC-1: A short overview

LPIC-1, LPI Exam, LPIC-1 Exam, LPIC Certifications

The world’s largest and most recognized Linux Certification


LPIC-1 is the first certification in LPI’s multi-level Linux professional certification program. The LPIC-1 will validate the candidate's ability to perform maintenance tasks on the command line, install and configure a computer running Linux and configure basic networking.

The LPIC-1 is designed to reflect current research and validate a candidate's proficiency in real world system administration. The objectives are tied to real-world job skills, which we determine through job task analysis surveying during exam development.

Current Version: 5.0 (Exam codes 101-500 and 102-500)

Objectives: 101-500, 102-500

Prerequisites: There are no prerequisites for this certification

Requirements: Passing exams 101 and 102

Validity Period: 5 years

Cost: Click here for exam pricing in your country.

Languages: English, German, Japanese, Portuguese, Spanish, Chinese (Simplified) and Chinese (Traditional). 

To become LPIC-1 certified the candidate must be able to:

◉ understand the architecture of a Linux system;

◉ install and maintain a Linux workstation, including X11 and setup it up as a network client;

◉ work at the Linux command line, including common GNU and Unix commands;

◉ handle files and access permissions as well as system security; and

◉ perform easy maintenance tasks: help users, add users to a larger system, backup and restore, shutdown and reboot.

LPIC-1 Exam 101 Topics


◉ System Architecture

◉ Linux Installation and Package Management

◉ GNU and Unix Commands

◉ Devices, Linux Filesystems, Filesystem Hierarchy Standard


LPIC-1 Exam 102 Topics


◉ Shells and Shell Scripting

◉ Interfaces and Desktops

◉ Administrative Tasks

◉ Essential System Services

◉ Networking Fundamentals

◉ Security

Saturday 25 January 2020

All About Linux and Linux+

What Is Linux?


In short, Linux is an open-source, UNIX-like operating system created by Linus Torvalds that runs a plethora of different devices today. When you do your online banking or use Google, Facebook or Twitter, you’re talking to Linux servers in the cloud. In fact, nearly all supercomputers and cloud servers run Linux, as does your Android smartphone and many other devices around your home and workplace, such as firewalls and routers. Even my touch-screen refrigerator, home media center and in-car GPS run Linux.

Linux and Linux+, LPI Study Materials, LPI Learning, LPI Guides, LPI Certification, LPI Online Exam, LPI Prep

Open source has been the key to Linux’s success. Software released under an open-source license gives other software developers access to modify the original source code that was used to create the software. This, in turn allows other software developers worldwide to quickly identify and fix bugs and security loopholes, as well as make feature improvements to the software. Consequently, open-source software evolves rapidly, and this is what transformed Linux into the world’s most flexible and powerful operating system since its conception more than 25 years ago.

Linus Torvalds and his team still develop the core operating system kernel and libraries. However, software developers worldwide develop the additional open-source libraries and software packages used with the Linux kernel. You may obtain different distributions of Linux as a result. All Linux distributions share the same kernel and libraries, yet have different software packaged with the kernel. There are hundreds of Linux distributions available – some common ones include Red Hat, Fedora, SuSE, Debian, Ubuntu and CentOS. And don’t forget Android!

It’s also important to note that Linux is functionally an open-source UNIX operating system – nearly all of the concepts, commands and files are identical between UNIX and Linux. If you use a Mac computer or iPhone, you are using a flavor of UNIX (Mac OS X and iOS are both UNIX operating systems), and many embedded systems and large servers still run UNIX today as well (e.g., BSD UNIX, Solaris UNIX, QNX). As a result, those who administer Linux systems often administer UNIX systems, and vice versa.

What Is CompTIA Linux+?


For the past two decades, employers have used certification as a skills benchmark for hiring and advancement in the IT industry. And as the need for skilled Linux administrators continues to grow, so does the need for Linux certification.

Linux and Linux+, LPI Study Materials, LPI Learning, LPI Guides, LPI Certification, LPI Online Exam, LPI Prep

CompTIA Linux+ (Powered by LPI) tests the fundamental usage and administrative tasks that are common to nearly all Linux distributions and UNIX flavors. The two exams that you have to pass to achieve the Linux+ certification (LX0-103 and LX0-104) essentially cover the same content as the two exams that you have to pass to achieve LPIC-1 (LPI Level 1 – Linux Administrator) certification from the Linux Professional Institute (LPI). As an added bonus, after achieving CompTIA Linux+, you can apply for and obtain the LPIC-1 certification directly on the CompTIA website. However, you cannot do the reverse – in other words, you cannot pass LPIC-1 and request Linux+.

Why Should You Become Linux+ Certified?


1. You get the industry brand recognition that comes with CompTIA. Many IT managers and human resources departments are very familiar with CompTIA certifications – they know that if the certification ends with a + symbol, it’s a good skills benchmark. And, as we discussed earlier, you also receive the LPIC-1 certification from LPI for additional brand recognition.

2. For most jobs involving Linux and/or UNIX, CompTIA Linux+ is the only Linux certification that you will need, as it covers the general administration tasks that most organizations seek when hiring for Linux/UNIX administration positions. Advanced topic areas not tested on Linux+ often involve specialized configuration that is specific to a particular organization and Linux distribution or UNIX flavor. Those who have a working knowledge of the general administration concepts tested on CompTIA Linux+ can easily research and perform these advanced configuration tasks as necessary.

3. CompTIA Linux+ and LPIC-1 provide a foundation for other Linux certifications. LPI offers two additional levels of certification that you can achieve after passing Linux+/LPIC-1:

LPIC-2 (LPI Level 2 – Linux Engineer), which tests additional system and network administration concepts.
LPIC-3 (LPI Level 3 – Linux Enterprise Professional), which tests one of three specific concept areas of your choice: Security, OpenLDAP/Samba, and virtualization/clustering.

Thursday 23 January 2020

The Evolution of DevOps Tools

How System Administrators and Product Owners Can Stay Current


DevOps is a field that continues to evolve rapidly – and in so doing, stir up strong emotions. Case in point: it is only recently that practitioners and thought-leaders have come to agree on a definition for DevOps. So, it’s understandable that as more organizations are adopting DevOps practices, the number and type of tools used to implement DevOps has also seen rapid growth. In fact, recently, one curated list counted over 200 DevOps tools in active use.

DevOps, LPI Tutorials and Material, LPI Certifications, LPI Online Exam, LPI Exam Prep

Given that to be successful in DevOps requires applying DevOps principles in practice – by knowing which tools to use and when to use them – System Administrators and Product Owners should stay current with how DevOps tools are evolving. Here are three of today’s most prominent trends in DevOps tools:

DevOps Tools Are Aligning with the DevOps Pipeline

The Continuous Delivery (CD) pipeline model consists of several sequential stages, with each stage having a specific role for moving software changes from development to production. The number of pipeline stages varies by team, but keeps to a common pattern: Build, Continuous Integration and Testing, and Deployment.

For better or worse, builders of DevOps tools have chosen to roll out their innovations based on the CD pipeline model rather than creating solutions that are specialized by other common criteria such as industry or team size.

DevOps Tools Are Integrating with Other Tools

DevOps tools increasingly include plugins for communicating with other tools used throughout the CD pipeline. For example, given its prevalence, all ‘build tools’ integrate with GitHub, allowing software changes to be built whenever changes are pushed to a GitHub repository.

This kind of integration means that team leaders overseeing DevOps projects need to ensure that the tools they choose work together with their software stack and deployment environment.

DevOps Tools Are Becoming Easier to Use

Because of the broad choice of DevOps tools available, ease-of-use has become a distinguishing feature. That’s because DevOps teams are constantly working against time pressures to write and deploy new software.

Also Read: LPIC-OT Exam 701: DevOps Tools Engineer

The focus on ease-of-use has caused the creators of DevOps tools to act. In fact, according to The Forrester Wave: Continuous Integration Tools, Q3 2017 report, the need for easy to use tools has: a) Given rise to complete Software-as-a-service (SaaS) Continuous Integration toolchains, like the private SaaS version of CloudBees Jenkins; b) Led to simpler alternatives to existing tools; and c) Including new features such as the Compose-file support added to Docker which allows a configuration file to be used in place of lengthy command-line arguments.

How You Can Stay Current with DevOps Tools

System Administrators and Product Owners should take the following steps to leverage these trends, choose the most appropriate DevOps tools – given a team’s skills, projects, and budgets, and stay current on how these tools continue to evolve:
  1. Review the tools you currently use at each stage of the CD pipeline. For each tool, establish performance benchmarks. Such benchmarks could include the time it takes to set up the tool, the time it takes to train someone on the tool, the time it takes to generate a meaningful report from the tool, and the number of times the tool underperforms.
  2. Monitor how DevOps tools are evolving by attending/participating in local DevOps Meetup groups and software user groups.
  3. Encourage members of your DevOps team to increase their skill in a broad range of DevOps tools – i.e. throughout the CD pipeline – and have them report to the team on the pros and cons of new tools.
  4. Monitor which DevOps tools that thought-leaders and/or competitors in your industry are training their DevOps teams to use.

Tuesday 21 January 2020

Introduction to Shell Scripting Basics

What is a Shell


A shell is an interpreter in UNIX like Operating system. It takes commands typed by the user and calls the operating system to run those commands. In simple terms a shell acts as form of wrapper around the OS. For example , you may use the shell to enter a command to list the files in a directtory , such as ls , or a command to copy ,such as cp.

[LPICentral@localhost ~]$ ls
 config  data  pam  test

Shell Scripting Basics, LPI Certification, LPI Guides, LPI Tutorial and Material, LPI Online Exam, LPI Prep

In this example , when you simply type ls and press enter . The $ is the shell prompt , which tells you the the shell awaits your commands.The remaining lines are the names of the files in the current directory.

What is Shell Prompt


The prompt, $, which is called command prompt, is issued by the shell. While the prompt is displayed, you can type a command. The shell reads your input after you press Enter. It determines the command you want executed by looking at the first word of your input. A word is an unbroken set of characters. Spaces and tabs separate words.

What are different types of Shells :

since there is no monopoly of shells , you are free to run any shell as you wish. That’s all well and good , but choosing a shell without knowing the alternative is not very helpful. Below are lists of shells available in UNIX/Linux.

1. The Bourne Shell


The Original Unix Shell is known as sh , short for shell or the Bourne shell , named for steven Bourne , the creator of sh. This is available on almost all the UNIX like operating system. The Basic bourne shell supports only the most limited command line editing, You can type the Characters,remove characters one at a time with the Backspace key and Press enter to execute the command. If command line gets messed up , you can press Ctrl-C to cancel the whole command.

2. The C Shell


It is desgined by Bill Joy at the university of california at Berkeley , the C shell was so named because much of its syntax parallels that of C programming language. This shell adds some neat features to the Bourne shell,especially the ability to recall previous commands to help create future commands.Because it is very likely you will need to execute more than one command to perform a particular task,this C shell capability is very useful.

3. The Korn Shell


It is created by David Korn at AT&T Bell laboratories , the korn shell or ksh offers the same kind of enhancements offers by the C Shell , with one important difference: The korn shell is backward compatible with the older Bourne shell Synatx. In UNIX like AIX & HP-UX korn shell is the default shell.

4. Bash ( The Bourne Again Shell)


Bash offers command-line editing like the korn shell,file name completion like the C shell and a lot of other advance features. Many Users view bash as having the best of the Korn and C shells in one shell. In Linux and Mac OS X system , bash is the default shell.

5. tcsh ( The T C Shell)


Linux systems popularized the T C shell ot Tcsh. Tcsh extends the traditional csh to add command line editing,file name completion and more. For example , tcsh will complete the file and directory names when you press Tab key(the same key used in bash). The older C shell did not support this feature.

What is Shell Script :

A Shell Script is a text file that contains one or more commands. In a shell script, the shell assumes each line of text file holds a separate command. These Commands appear for most parts as if you have typed them in at a shell windows.

Why To Use Shell Script :

Shell scripts are used to automate administrative tasks,encapsulate complex configuration details and get at the full power of the operating system.The ability to combine commands allows you to create new commands ,thereby adding value to your operating system.Futhermore ,combining a shell with graphical desktop enviorment allows you to get the best of both worlds.

Creating a First Script :

Create a text file in your current directory with a name myscript.sh , all the shell scripts have an “.sh” extension. First line of a shell script is either #!/bin/sh or #!/bin/bash , it is knows as shebang because # symbol is called hash and ! Symbol is called a bang. Where as /bin/sh & /bin/bash shows that commands to be executed either sh or bash shell. Bleow are the contents of a myscript.sh

#!/bin/bash
 #Written by LPICentral
 pwd
 date

Assgin the Executable Permissions using below Command :

# chmod a+x myscript.sh

Now Execute the Script.

# sh myscript.sh

OR

# ./myscript.sh

Above shell script will display the current working directory along with date & time of the linux box.

Note: To execute your any shell script available in current directory you would execute using ./<Script-Name>

Taking Input From a User in the Shell Script.

Read command is used to take inputs from user via keyboard and assgin the vaule to a variable. Echo command is used to display the contents.

Example : Modify the myscript.sh file as shown below

#!bin/bash
 echo 'What is Your Name?'
 read name
 echo "My Name is, $name"

Now Execute the script and will get the below output.

# sh myscript.sh
 What is Your Name?
LPICentral
 My Name is, LPICentral

Saturday 18 January 2020

Head Command Examples in Unix / Linux

Linux Command, Unix Command, Head Command, Linux Certification

The head command in unix or linux system is used to print the first N lines from the file to the terminal. The syntax of head command is

head [options] [files]

The head command options are:

◉ c : Prints the first N bytes of file; With leading -, prints all but the last N bytes of the file.
◉ n : Prints first N lines; With leading - print all but the last N lines of each file.

Head Command Examples: 


Create the following file in your linux or unix operating system for practicing the examples:

> cat example.txt
linux storage
ubuntu os
fedora

1. Display first 10 lines 


By default, the head command prints the first 10 lines from a file.

> head example.txt

2. Display first N lines 


Use the -n option to print the first n lines from a file. The following example prints the first 2 lines from the file:

> head -n2 example.txt
linux storage
ubuntu os

3. Skip last N lines 


You can skip the last N lines from a file and print the remaining lines. The following example skips the last 2 lines and prints the remaining lines.

> head -n-2 example.txt
linux storage

4. Print the first n bytes. 


use the -c option to print the first N bytes from the file. The following example prints the first 5 bytes from the file.

> head -c5 example.txt
linux

5. Skip printing last n bytes. 


Use the leading "-", to skip printing last N bytes.

> head -c-7 example.txt
linux storage
ubuntu os

6. Print line between M and N lines. 


You can combine the head command with tail command to print lines between the line numbers M and N. The following command prints the lines between numbers 5 and 10.

> head -n10 filename | tail -5

Thursday 16 January 2020

Unix Interview Questions on FIND Command

LPI Question and Answers, LPI Exam Prep, LPI Tutorials and Material, LPI Learning

Find utility is used for searching files using the directory information.

1. Write a command to search for the file 'test' in the current directory?


find -name test -type f

2. Write a command to search for the file 'temp' in '/usr' directory?


find /usr -name temp -type f

3. Write a command to search for zero byte size files in the current directory?


find -size 0 -type f

4. Write a command to list the files that are accessed 5 days ago in the current directory?


find -atime 5 -type f

LPI Question and Answers, LPI Exam Prep, LPI Tutorials and Material, LPI Learning

5. Write a command to list the files that were modified 5 days ago in the current directory?


find -mtime 5 -type f

6. Write a command to search for the files in the current directory which are not owned by any user in the /etc/passwd file?


find . -nouser -type f

7. Write a command to search for the files in '/usr' directory that start with 'te'?


find /usr -name 'te*' -type f

8. Write a command to search for the files that start with 'te' in the current directory and then display the contents of the file?


find . -name 'te*' -type f -exec cat {} \;

9. Write a command to list the files whose status is changed 5 days ago in the current directory?


find -ctime 5 -type f

10. Write a command to list the files in '/usr' directory that start with 'ch' and then display the number of lines in each file?


find /usr -name 'ch*' -type f -exec wc -l {} \;

Tuesday 14 January 2020

9 Useful touch command examples in Linux

Touch command is used to create empty files and also changes the timestamps of existing files on Unix & Linux System. Changing timestamps here means updating the access and modification time of files and directories.

Touch Command, Linux Guides, Linux Learning, Linux Certification, LPI Study Materials

Let’s have a look on the syntax and options used in touch command,

Syntax: # touch {options} {file}

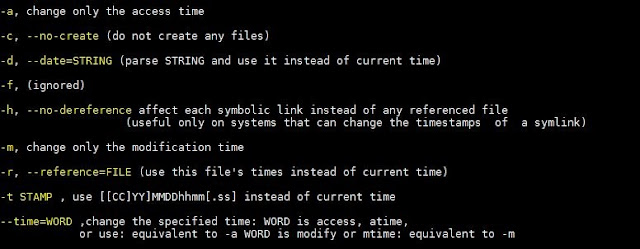
Options used in touch command,

Touch Command, Linux Guides, Linux Learning, Linux Certification, LPI Study Materials

In this article we will walk through 9 useful touch command examples in Linux,

Example: 1 Create an empty file using touch


To create an empty file using touch command on Linux systems, type touch followed by the file name, example is shown below,

[root@lpicentral ~]# touch devops.txt
[root@lpicentral ~]# ls -l devops.txt
-rw-r--r--. 1 root root 0 Mar 29 22:39 devops.txt
[root@lpicentral ~]#

Example: 2 Create empty files in bulk using touch


There can be some scenario where we have to create lots of empty files for some testing, this can be easily achieved using touch command,

[root@lpicentral ~]# touch sysadm-{1..20}.txt

In the above example we have created 20 empty files with name sysadm-1.txt to sysadm-20.txt, you can change the name and numbers based on your requirements.

Example: 3 Change / Update access time of a file and directory


Let’s assume we want to change access time of a file called “devops.txt“, to do this use ‘-a‘ option in touch command followed by file name, example is shown below,

[root@lpicentral ~]# touch -a devops.txt
[root@lpicentral ~]#

Now verify whether access time of a file has been updated or not using ‘stat’ command

[root@lpicentral ~]# stat devops.txt
  File: ‘devops.txt’
  Size: 0               Blocks: 0          IO Block: 4096   regular empty file
Device: fd00h/64768d    Inode: 67324178    Links: 1
Access: (0644/-rw-r--r--)  Uid: (    0/    root)   Gid: (    0/    root)
Context: unconfined_u:object_r:admin_home_t:s0
Access: 2018-03-29 23:03:10.902000000 -0400
Modify: 2018-03-29 22:39:29.365000000 -0400
Change: 2018-03-29 23:03:10.902000000 -0400
 Birth: -
[root@lpicentral ~]#

Change access time of a directory,

Let’s assume we have a ‘nfsshare’ folder under /mnt, Let’s change the access time of this folder using the below command,

[root@lpicentral ~]# touch -m /mnt/nfsshare/
[root@lpicentral ~]#

[root@lpicentral ~]# stat /mnt/nfsshare/
  File: ‘/mnt/nfsshare/’
  Size: 6               Blocks: 0          IO Block: 4096   directory
Device: fd00h/64768d    Inode: 2258        Links: 2
Access: (0755/drwxr-xr-x)  Uid: (    0/    root)   Gid: (    0/    root)
Context: unconfined_u:object_r:mnt_t:s0
Access: 2018-03-29 23:34:38.095000000 -0400
Modify: 2018-03-03 10:42:45.194000000 -0500
Change: 2018-03-29 23:34:38.095000000 -0400
 Birth: -
[root@lpicentral ~]#

Example: 4 Change Access time without creating new file


There can be some situations where we want to change access time of a file if it exists and avoid creating the file.  Using ‘-c‘ option in touch command, we can change access time of a file if it exists and will not a create a file, if it doesn’t exist.

[root@lpicentral ~]# touch -c sysadm-20.txt
[root@lpicentral ~]# touch -c winadm-20.txt
[root@lpicentral ~]# ls -l winadm-20.txt
ls: cannot access winadm-20.txt: No such file or directory
[root@lpicentral ~]#

Example: 5 Change Modification time of a file and directory


Using ‘-m‘ option in touch command, we can change the modification time of a file and directory,

Let’s change the modification time of a file called “devops.txt”,

[root@lpicentral ~]# touch -m devops.txt
[root@lpicentral ~]#

Now verify whether modification time has been changed or not using stat command,

[root@lpicentral ~]# stat devops.txt
  File: ‘devops.txt’
  Size: 0               Blocks: 0          IO Block: 4096   regular empty file
Device: fd00h/64768d    Inode: 67324178    Links: 1
Access: (0644/-rw-r--r--)  Uid: (    0/    root)   Gid: (    0/    root)
Context: unconfined_u:object_r:admin_home_t:s0
Access: 2018-03-29 23:03:10.902000000 -0400
Modify: 2018-03-29 23:59:49.106000000 -0400
Change: 2018-03-29 23:59:49.106000000 -0400
 Birth: -
[root@lpicentral ~]#

Similarly, we can change modification time of a directory,

[root@lpicentral ~]# touch -m /mnt/nfsshare/
[root@lpicentral ~]#

Example:6 Changing access and modification time in one go


Use “-am” option in touch command to change the access and modification together or in one go, example is shown below,

[root@lpicentral ~]# touch -am devops.txt
[root@lpicentral ~]#

Cross verify the access and modification time using stat,

[root@lpicentral ~]# stat devops.txt
  File: ‘devops.txt’
  Size: 0               Blocks: 0          IO Block: 4096   regular empty file
Device: fd00h/64768d    Inode: 67324178    Links: 1
Access: (0644/-rw-r--r--)  Uid: (    0/    root)   Gid: (    0/    root)
Context: unconfined_u:object_r:admin_home_t:s0
Access: 2018-03-30 00:06:20.145000000 -0400
Modify: 2018-03-30 00:06:20.145000000 -0400
Change: 2018-03-30 00:06:20.145000000 -0400
 Birth: -
[root@lpicentral ~]#

Example:7 Set the Access & modification time to a specific date and time


Whenever we do change access and modification time of a file & directory using touch command, then it set the current time as access & modification time of that file or directory,

Let’s assume we want to set specific date and time as access & modification time of a file, this is can be achieved using ‘-c’ & ‘-t’ option in touch command,

Date and Time can be specified in the format: {CCYY}MMDDhhmm.ss

Where:

◈ CC – First two digits of a year
◈ YY – Second two digits of a year
◈ MM –  Month of the Year (01-12)
◈ DD – Day of the Month (01-31)
◈ hh –  Hour of the day (00-23)
◈ mm – Minutes of the hour (00-59)

Let’s set the access & modification time of devops.txt file for future date and time( 2025 year, 10th Month, 19th day of month, 18th hours and 20th minute)

[root@lpicentral ~]# touch -c -t 202510191820 devops.txt

Use stat command to view the update access & modification time,

Set the Access and Modification time based on date string, Use ‘-d’ option in touch command and then specify the date string followed by the file name, example is shown below,

[root@lpicentral ~]# touch -c -d "2010-02-07 20:15:12.000000000 +0530" sysadm-29.txt
[root@lpicentral ~]#

Verify the status using stat command,

[root@lpicentral ~]# stat sysadm-20.txt
  File: ‘sysadm-20.txt’
  Size: 0               Blocks: 0          IO Block: 4096   regular empty file
Device: fd00h/64768d    Inode: 67324189    Links: 1
Access: (0644/-rw-r--r--)  Uid: (    0/    root)   Gid: (    0/    root)
Context: unconfined_u:object_r:admin_home_t:s0
Access: 2010-02-07 20:15:12.000000000 +0530
Modify: 2010-02-07 20:15:12.000000000 +0530
Change: 2018-03-30 10:23:31.584000000 +0530
 Birth: -
[root@lpicentral ~]#

Note: In above commands, if we don’t specify ‘-c’ then touch command will create a new file in case it doesn’t exist on the system and will set the timestamps whatever is mentioned in the command.

Example: 8 Set the timestamps to a file using a reference file (-r)


In touch command we can use a reference file for setting the timestamps of file or directory. Let’s assume I want to set the same timestamps of file “sysadm-20.txt” on “devops.txt” file. This can be easily achieved using ‘-r’ option in touch.

Syntax: # touch -r {reference-file} actual-file

[root@lpicentral ~]# touch -r sysadm-20.txt devops.txt
[root@lpicentral ~]#


Example: 9 Change Access & Modification time on symbolic link file


By default, whenever we try to change timestamps of a symbolic link file using touch command then it will change the timestamps of original file only, In case you want to change timestamps of a symbolic link file then this can be achieved using ‘-h’ option in touch command,

Syntax: # touch -h {symbolic link file}

[root@lpicentral opt]# ls -l /root/linuxgeeks.txt
lrwxrwxrwx. 1 root root 15 Mar 30 10:56 /root/linuxgeeks.txt -> linuxadmins.txt
[root@lpicentral ~]# touch -t 203010191820 -h linuxgeeks.txt
[root@lpicentral ~]# ls -l linuxgeeks.txt
lrwxrwxrwx. 1 root root 15 Oct 19  2030 linuxgeeks.txt -> linuxadmins.txt
[root@lpicentral ~]#

Saturday 11 January 2020

CVS command Examples - Unix / Linux

LPI Tutorials and Materials, LPI Guides, LPI Learning, LPI Certifications

CVS (concurrent Version Control system) is a version controlling system used to record the history of the files. Whenever a code is changed in software, there might be chance of bugs creeping into that. With CVS, you can easily get the old version of the code and see what part of the code exactly created the bug.

In CVS, we can save every version of the file. The CVS only stores the differences between the files. This saves a huge amount of disk space.

The general syntax of CVS command is

cvs [option] filename

CVS Command Examples:

1. Checking out file


You can check out a file from the CVS repository with the checkout (co) option. This is shown below:

cvs co oracle_storage.dat

2. Adding a file to the repository


Use the add option to add a new file to the cvs repository.

cvs add mysql.bat

This will not commit the file to the cvs. It just simply adds the file.

3. Committing the file.


Once you have added a file to the CVS repository, you have to commit the file. Use the commit option with cvs command for committing a file.

cvs commit msql.bat

This will open an editor. Enter the comments and save by using the :wq.

4. Difference between files


You can find the differences between the local file with the latest version of the file in the cvs repository using the diff option.

cvs diff wireless.php

5. Update the file


You can update the local file with the latest version of the file from CVS repository using the update option.

cvs update -A network.dat

6. Update to particular version


You can get a particular version of the file from the cvs. Specify the version number of the file with -j option.

cvs update -j version-number network.bat

7. Adding binary files

You can add binary or image files to the CVS repository. Use the -kb option to add binary files.

cvs add -kb unix.png

8. Removing file from CVS

You can remove unwanted files permanently from the CVS repository using the remove option.

cvs remove linux_system.dat

After issuing this command you have to do a cvs commit. Otherwise the file will not be removed from the repository.

Thursday 9 January 2020

SSH Command Examples - Unix / Linux

SSH Command, Unix Command, Linux Command, LPI Study Materials

SSH client utility in unix or linux server is used to logging into a remote host and execute commands on the remote machine. The rlogin and rsh commands can also be used to login into the remote machine. However these are not secure. The ssh command provides a secure connection between two hosts over a insecure network.

The syntax ssh command is

ssh [-l username] hostname | user@remote-hostname [command]

Let see the examples of ssh command.

SSH Command Examples:


1. Logging to a remote server


You can login to a remote server from the local host as shown below:

localhost:[~]> ssh -l username remote-server
username@remote-server password:
remote-server:[~]>

Alternatively you can use the below ssh command for connecting to remote host:

localhost:[~]> ssh username@remote-server
username@remote-server password:
remote-server:[~]>

Note: If you are logging for the first time, then it will prints a message that host key not found and you can give yes to continue. The host key of the remote server will be cached and added to the .ssh2/hostkeys directory in your home directory. From second time onwards you just need to enter the password.

2. Logging out from remote server


Simply enter the exit command on the terminal to close the connection. This is shown below:

remote-server:[~]>exit
logout
Connection to remote-server closed.
localhost:[~]>

3. Running remote commands from local host


Sometimes it is necessary to run the unix commands on the remote server from the local host. An example is shown below:

localhost:[~]> ssh user@remote-host "ls test"
online-backup.dat
oracle-storage.bat
unix-dedicated-server.txt

The ssh command connects to the remote host, runs the ls command, prints the output on the local host terminal and exits the connection from remote host.

SSH Command, Unix Command, Linux Command, LPI Study Materials

Let see whether the ls command actually displayed the correct result or not by connecting to the remote host.

localhost:[~]> ssh user@remote-host
user@remotehost password:
remotehost:[~]> cd test
remotehost:[~/test]> ls
online-backup.dat
oracle-storage.bat
unix-dedicated-server.txt

4. Version of the SSH command


We can find the version of SSH installed on the unix system using the -V option to the ssh. This is shown below:

> ssh -V
OpenSSH_4.3p2, OpenSSL 0.9.8e-fips-rhel5 01 Jul 2018

5. Debugging the SSH Client


When we are not able to connect to the remote host, it is good to debug and find the exact error messages that causing the issue. Use the -v option for debugging the ssh client.

ssh -v user@remote-host
OpenSSH_4.3p2, OpenSSL 0.9.8e-fips-rhel5 01 Jul 2018
debug1: Reading configuration data /etc/ssh/ssh_config
debug1: Applying options for *
debug1: Connecting to remote-host [172.22.200.140] port 22.
debug1: Connection established.
debug1: identity file /home/user/.ssh/identity type -1
debug1: identity file /home/user/.ssh/id_rsa type -1
debug1: identity file /home/user/.ssh/id_dsa type 2
debug1: loaded 3 keys
..........
..........

6. Copying files between remote host and local host.


We can use the scp command to copy the files securely between the local host and remote host using the ssh authentication.

To copy the file from local host to remote hosts /var/tmp/ directory, run the below scp command.

scp filename user@remote-host:/var/tmp/

To copy the file from remote hosts /usr/local/bin/ directory to local hosts current directory, run the below scp command.

scp user@remote-host:/usr/local/bin/add.sh.

Tuesday 7 January 2020

What is a Arch Linux?

Arch Linux, Linux Study Materials, LPI Guides, LPI Tutorial and Materials

Arch Linux is an independently developed, x86-64 general-purpose GNU/Linux distribution that strives to provide the latest stable versions of most software by following a rolling-release model. The default installation is a minimal base system, configured by the user to only add what is purposely required.

Principles


Simplicity

Arch Linux defines simplicity as without unnecessary additions or modifications. It ships software as released by the original developers (upstream) with minimal distribution-specific (downstream) changes: patches not accepted by upstream are avoided, and Arch's downstream patches consist almost entirely of backported bug fixes that are obsoleted by the project's next release.

In a similar fashion, Arch ships the configuration files provided by upstream with changes limited to distribution-specific issues like adjusting the system file paths. It does not add automation features such as enabling a service simply because the package was installed. Packages are only split when compelling advantages exist, such as to save disk space in particularly bad cases of waste. GUI configuration utilities are not officially provided, encouraging users to perform most system configuration from the shell and a text editor.

Modernity

Arch Linux strives to maintain the latest stable release versions of its software as long as systemic package breakage can be reasonably avoided. It is based on a rolling-release system, which allows a one-time installation with continuous upgrades.

Arch incorporates many of the newer features available to GNU/Linux users, including the systemd init system, modern file systems, LVM2, software RAID, udev support and initcpio (with mkinitcpio), as well as the latest available kernels.

Pragmatism

Arch is a pragmatic distribution rather than an ideological one. The principles here are only useful guidelines. Ultimately, design decisions are made on a case-by-case basis through developer consensus. Evidence-based technical analysis and debate are what matter, not politics or popular opinion.

The large number of packages and build scripts in the various Arch Linux repositories offer free and open source software for those who prefer it, as well as proprietary software packages for those who embrace functionality over ideology.

User centrality

Whereas many GNU/Linux distributions attempt to be more user-friendly, Arch Linux has always been, and shall always remain user-centric. The distribution is intended to fill the needs of those contributing to it, rather than trying to appeal to as many users as possible. It is targeted at the proficient GNU/Linux user, or anyone with a do-it-yourself attitude who is willing to read the documentation, and solve their own problems.

All users are encouraged to participate and contribute to the distribution. Reporting and helping fix bugs is highly valued and patches improving packages or the core projects are very appreciated: Arch's developers are volunteers and active contributors will often find themselves becoming part of that team. Archers can freely contribute packages to the Arch User Repository, improve the ArchWiki documentation, provide technical assistance to others or just exchange opinions in the forums, mailing lists, or IRC channels. Arch Linux is the operating system of choice for many people around the globe, and there exist several international communities that offer help and provide documentation in many different languages.

Versatility

Arch Linux is a general-purpose distribution. Upon installation, only a command-line environment is provided: rather than tearing out unneeded and unwanted packages, the user is offered the ability to build a custom system by choosing among thousands of high-quality packages provided in the official repositories for the x86-64 architecture.

Arch is backed by pacman, a lightweight, simple and fast package manager that allows to upgrade the entire system with one command. Arch also provides the Arch Build System, a ports-like system to make it easy to build and install packages from source, which can also be synchronized with one command. In addition, the Arch User Repository contains many thousands more of community-contributed PKGBUILD scripts for compiling installable packages from source using the makepkg application. It is also possible for users to build and maintain their own custom repositories with ease.

Sunday 5 January 2020

du Command in LINUX

du Command, Linux Certification, Linux Tutorial and Material, Linux Learning, LPI Guides, Linux Online Exam

While working on LINUX, there might come a situation when you want to transfer a set of files or the entire directory. In such a case, you might wanna know the disk space consumed by that particular directory or set of files. As you are dealing with LINUX, there exists a command line utility for this also which is du command that estimates and displays the disk space used by files.

So, in simple words du command-line utility helps you to find out the disk usage of set of files or a directory.

Here’s the syntax of du command :

//syntax of du command

du [OPTION]... [FILE]...
       or
du [OPTION]... --files0-from=F

where OPTION refers to the options compatible with du command and FILE refers to the filename of which you wanna know the disk space occupied.

Using du command


Suppose there are two files say kt.txt and pt.txt and you want to know the disk usage of these files, then you can simply use du command by specifying the file names along with it as:

//using du command

$du kt.txt pt.txt
8       kt.txt
4       pt.txt

/* the first column
displayed the file's
disk usage */

So, as shown above du displayed the disk space used by the corresponding files.

Now, the displayed values are actually in the units of the first available SIZE from – -block-size, and the DU_BLOCK_SIZE, BLOCK_SIZE and BLOCKSIZE environment variables and if not in this format then units are default to 1024 bytes (or 512 if POSIXLY_CORRECT is set).

Don’t get puzzled from the above paragraph. We can simply use -h option to force du to produce the output in the human readable format.

Options for du command


◈ -a, – -all option : This option produces counts as output for all files, not for just directories.

◈ – -apparent-size option : This prints the apparent sizes for the files and not the disk usage which can be larger due to holes in files (sparse), internal fragmentation and indirect blocks but in real the apparent size is smaller.

◈ -c, – -total option : This displays a grand total.

◈ -B, – -block-size=SIZE option : This option causes the size to scale by SIZE like -BM prints the size in Megabytes.

◈ -b, – -bytes option : This option is equivalent to – -apparent-size – -block-size=1.

◈ -D, – -dereference-args option : This option is used to dereference only the symbolic links listed on the command line.

◈ -H option : This option is equivalent to the above -D option.

◈ – -files0-from=F option : This is used to summarize disk usage of the NUL-terminated file names specified in the file F and if the file F is “-” then read names from the standard input.

◈ -h, – -human-readable option : This prints the sizes in human readable format i.e in rounding values and using abbreviations like 1 K and this is the most often used option with du.

◈ – -si option: This is much similar to the -h option but uses power of 1000 and not of 1024.

◈ -k option : its equivalent to – -block-size=1K.

◈ -l, – -count-links option : This count sizes many times if files are hard-linked.

◈ -m option : This is equivalent to – – block-size=1M.

◈ -L, – -dereference option : This option dereferences all symbolic links.

◈ -P, – -no-dereference option : This option tells du not to follow any symbolic links which is by default setting.

◈ -0, –null option : This ends each output line with 0 byte rather than a newline.

◈ -S, – -separate-dirs option : This causes the output not to include the size of subdirectories.

◈ -s, – -summarize option : This option will allow to display a total only for each argument.

◈ -x, – -one-file-system option : This will cause du to skip directories on different file systems.

◈ -X, – -exclude-from=FILE option : Exclude files that match any pattern given in FILE.

◈ – -exclude=PATTERN option : It will exclude files that match PATTERN.
-d, – -max-depth=N option : Print the total for a directory (or file, with –all) only if it is N or fewer levels below the command line argument; –max-depth=0 is the same as –summarize.

◈ – -time option : This will show the time of the last modification of any file in the directory, or any of its subdirectories.

◈ – -time=WORD option : This shows time as WORD instead of modification time :atime, access, use, ctime or status.

◈ – -time-style=STYLE option : this shows time using STYLE: full-iso, long-iso, iso, or +FORMAT (FORMAT is interpreted like the format of date).

◈ – -help option : This will display a help message and exit.

◈ – -version option : This will display version info and exit.

Examples of using du command


1. Using -h option : As mentioned above, -h option is used to produce the output in human readable format.

//using -h with du

$du -h kt.txt pt.txt
8.0K    kt.txt
4.0K    pt.txt

/*now the output
is in human readable
format i.e in
Kilobytes */

2. Using du to show disk usage of a directory : Now, if you will pass a directory name say kartik as an argument to du it will show the disk usage info of the input directory kartik and its sub-directories (if any).

/*using du to display disk usage
of a directory and its
sub-directories */

$du kartik
4       kartik/xyz
24      kartik

Above the disk usage info of the directory kartik and its sub-directory xyz is displayed.

3. Using -a option : now, as seen above only the disk usage info of directory
kartik and its sub-directory xyz is displayed but what if you also want to know the disk usage info of all the files present under the directory kartik. For this, use -a option.

//using -a with du

$du -a kartik
8       kartik/kt.txt
4       kartik/pt.txt
4       kartik/pranjal.png
4       kartik/xyz.png
4       kartik/xyz
24      kartik

/*so with -a option used
all the files (under directory
kartik) disk usage info is
displayed along with the
xyz sub-directory */

4. Using -c option : This option displays the grand total as shown.

//using -c with du

$du -c -h kt.txt pt.txt
8.0K    kt.txt
4.0K    pt.txt
12.0K   total

/* at the end
total is displayed
for the disk usage */

5. Using – -time option : This option is used to display the last modification time in the output of du.

//using --time with du

$du --time kt.txt
4       2017-11-18 16:00       kt.txt

/*so the last
modification date and
time gets displayed
when --time
option is used */

6. Using – -exclude=PATTERN option : In one of the example above, all the files disk usage related info was displayed of directory kartik. Now, suppose you want to know the info of .txt files only and not of .png files, in that case to exclude the .png pattern you can use this option.

//using --exclude=PATTERN with du

$du --exclude=*.png -a kartik
8       kartik/kt.txt
4       kartik/pt.txt
4       kartik/xyz
24      kartik

/*so, in this case
.png files info are
excluded from the output */

7. Using – -max-depth=N option : Now, this option allows you to limit the output of du to a particular depth of a directory.

Suppose you have a directory named FRIENDS under which you have sub-directories as FRIENDS/college and FRIENDS/school and also under sub-directory college you have another sub-directory as FRIENDS/college/farewell then you can use – -max-depth=N option in this case as:

//using --max-depth=N with du

$du --max-depth=0 FRIENDS
24       FRIENDS

/* in this case you
restricted du output
only to top=level
directory */

Now, for sub-directories college and school you can use :

$du --max-depth=1 FRIENDS
16      FRIENDS/college
8       FRIENDS/school
24      FRIENDS

Now, for FRIENDS/college/farewell you can use –max-depth=2 as:

$du --max-depth=2 FRIENDS
4       FRIENDS/college/farewell
16      FRIENDS/college
8       FRIENDS/school
24      FRIENDS

/*so this is how N
in --max-depth=N
is used for levels */

8. Using – -files0-from=F option : As mentioned above, this is used to summarize disk usage of the NUL-terminated file names specified in the file F and if the file F is “-” then read names from the standard input.

Let’s use this option for taking input from STDIN as:

//using --files0from=F with du

$pwd
/home/kartik

$ls
kt.txt pt.txt xyz

/*now use this option for
taking input from
STDIN */

$du --files0-from=-
kt.txt8 kt.txt
pt.txt4 pt.txt

/* in this case after
giving kt.txt as a input
from STDIN there is need to
press Ctrl+D twice then the
output is shown and same for
pt.txt or any other file name
given from STDIN */

Applications of du command


◈ It can be used to find out the disk space occupied by a particular directory in case of transferring files from one computer to another.
◈ du command can be linked with pipes to filters.A filter is usually a specialized program that transforms the data in a meaningful way.
◈ There also exists some other ways like df command to find the disk usage but they all lack du ability to show the disk usage of individual directories and files.
◈ It can also be used to find out quickly the number of sub-directories present in a directory.

Example of using du with filters


Let’s take a simple example of using du with sort command so that the output produced by du will be sorted in the increasing order of size of files.

$du -a kartik
8       kartik/kt.txt
4       kartik/pt.txt
4       kartik/pranjal.png
4       kartik/xyz.png
4       kartik/xyz
24      kartik

/*now using du to produce
sorted output */

$du -a kartik | sort -n
4       kartik/pt.txt
4       kartik/pranjal.png
4       kartik/xyz.png
4       kartik/xyz
8       kartik/kt.txt
24      kartik

/* now the output displayed
is sorted according to the size */

The sort command along with -n option used causes to list the output in numeric order with the file with the smallest size appearing first.
In this way du can be used to arrange the output according to the size.

That’s all about du command.

Thursday 2 January 2020

How can CompTIA Linux+ (Powered by LPI) Certification Holders obtain LPIC-1?

CompTIA Linux+ Certifications, CompTIA Linux+ Online Exam, LPIC-1 Study Materials, LPIC-1 Tutorial and Materials

Quick Facts


◉ CompTIA released their own Linux+ exam in 2019 which will not be eligible for obtaining the LPIC-1

◉ Candidates who pass the "Powered by LPI" version of the Linux+ exams (LX0-103 and LX0-104) can still obtain the LPIC-1. CompTIA will continue to offer these two exams until October 1, 2019.

Obtaining the LPIC-1 with your CompTIA Linux+ (Powered by LPI)


The Linux+ Powered by LPI certification, is functionally identical to the LPIC-1 version 4.0 from Linux Professional Institute.

LPIC-1 is the first of a three-tier, comprehensive jobs-oriented Linux skills assessment program.  More about LPIC-1 can be found here, and information about other LPI certifications can be found here.

All certified holders of CompTIA Linux + (Powered by LPI) are eligible to receive the LPIC-1 certification until October 1, 2019, which is when the CompTIA LX0-103 and LX0-104 exams will be retired. Candidates interested in claiming their LPIC-1 certification and continuing with the LPIC certification track should follow these steps:

1. Acquire an LPI ID:

Your LPI ID can be acquired by registering at www.lpi.org/register.

2. Go to the CompTIA website and log in to your account with your CompTIA credentials. 

To forward your CompTIA Linux+ exam results to the Linux Professional Institute (LPI), log into your CompTIA certification account and click on Demographics and then Settings. Click on the LPI preference dropdown to indicate that you want your test results shared with LPI. Please allow 48 hours for LPI to receive your exam results from CompTIA.

3. Once LPI receives your exam results you will receive the LPIC-1 automatically and you will be notified by email. 

Linux Professional Institute encourages all eligible candidates to claim their LPIC-1 certification. There’s no cost to do this.

This year, Linux Professional Institute will launch their membership program, and all certification holders will be eligible to become members. Through the program, LPI will be offering a number of benefits, focusing on career advancement, continuing education, personal networking, community recognition, and advancing common interests in open source at the local level and throughout the world. More information on the program will be available soon.

Background


For nearly a decade, CompTIA has worked with Linux Professional Institute (LPI) to provide its career-oriented skills certification in the configuration and administration of computer systems running the Linux operating system.

Until now, CompTIA has offered the “Linux+ Powered by LPI” certification. This has been functionally identical to, LPI’s LPIC-1 certification -- the first level of a three-tier comprehensive jobs-oriented Linux skills-assessment program.

This year, the partnership will be ending and CompTIA will release its own “Linux+” certification which is completely independent of LPI. It is our understanding that the original “Powered by LPI” version of Linux+ will be offered in parallel with the new one until October 1, 2019.

What has changed in LPIC-1?


Nothing except our routine updates. The multi-level LPIC credential remains the world’s most desired open source certification. We continue to work towards keeping it globally relevant to the needs of employers and those wanting a career in open source. The recently-released version 5, a major update to LPIC-1, demonstrates the latest in our ongoing commitment to track important changes to Linux systems that are important to those seeking employment or entrepreneurship in the field. As an organization we remain committed to reflecting the needs of open source practitioners, which we have done since the day LPI began.

What has changed in the CompTIA Linux+ program?


The new CompTIA Linux+ certification indicates a significant departure from the previous program that was based on LPIC-1. It covers less material and as a result goes from two exams to one. Its exam development process no longer relies on LPI’s global community of open source experts to maintain quality, completeness and relevance to the evolution of Linux.

Holders of the existing “Linux+ powered by LPI” certification have been able, at no cost, to obtain the LPIC-1 designation as well. The new CompTIA Linux+ certification is no longer eligible for this. Therefore it is no longer sufficient or acceptable as a prerequisite for LPI’s advanced LPIC-2 and LPIC-3 programs.

Only holders of the “Powered by LPI” version of Linux+, requiring exams LX0-103 and LX0-104, may obtain LPIC-1 designation in addition to their Linux+ certification.

When will my CompTIA Linux+ certificate expire?


That is up to CompTIA’s policies over which LPI has no control. Previous “Linux+ powered by LPI” certifications whose holders which have obtained LPIC-1 designation remain subject to LPI’s policies (regarding their LPIC-1) and will remain active for five years from the original date of certification. LPI is developing a new membership program which will enable members to maintain their status without additional testing.

What are the advantages of the LPI Linux programs?


Linux Professional Institute has been promoting jobs and entrepreneurship in the field of open source for 20 years. Its proven four-level program of Linux certification enables practitioners around the world to rise to their level of interest using technology models that elevate the world.

◉ Linux Essentials is our most accessible program, proving the skills necessary for entry-level positions using Linux. It provides the basic foundation for branching into web services, software development and specialized fields such as 3D printing.

◉ LPIC-1 is our foundational certification program and readies the career-seeker for environments that require a well-rounded, complete understanding of any Linux system.

◉ LPIC-2 builds on LPIC-1 to prove more-advanced skills in Linux administration, Internet tools and system security for larger installations.

◉ LPIC-3 is the top-level certification that tests specialized enterprise-scale skills required for enhanced network security, high-availability computing and working in mixed environments.

Together the four levels of LPI testing provide a seamless and unmatched progression from open source beginner to enterprise expert. All levels of LPI exams receive the same level of quality and commitment to advancing careers and entrepreneurship in open source.

Source: lpi.org/comptia